|
Building a MIDI arpeggiator Introduction ChucK is, as stated on its site, an audio programming language for real-time synthesis, composition, and performance - fully supported on MacOS X, Windows, and Linux. ChucK presents a new time-based, concurrent programming model that's highly precise and expressive (we call this strongly-timed), as well as dynamic control rates, and the ability to add and modify code on-the-fly. In addition, ChucK supports MIDI, OSC, HID device, and multi-channel audio. ChucK is great for experimenting with sound synthesis and MIDI, but also a powerful weapon for live performances. This article is an introduction on using this incredible tool and showing how smooth its learning curve is. To prove this we're going to develop a simple MIDI arpeggiator in a bunch of lines of code. The aim of the complete series of articles will be crafting a sort of framework to be used live or while experimenting.
Before we start
I take for granted that you have already installed ChucK on your system, no matter if from binaries or sources and that you have tested it with one of the examples included in the distribution.
One note, I work on Linux so the following section about the tools to use is a bit specific for it. Windows/MacOS users don't have to worry, as Chuck is fully compatible with their systems too, and the rest of the article will be platform independent.
Suggested configuration for Linux users (but please read it anyway)
We'll be using a simple software configuration. I strongly suggest to use Jack over alsa, and given this here is the minimum that we need: - Jack (ChucK also supports oss and alsa)
- qjackctl, a gui to control Jack
- ChucK, obviously, compiled for your sound system
- A software synthetizer with midi support(ZynAddSubFx is a great one, particularly for experimentation purposes)
- A virtual MIDI keyboard (vkeybd is a simple one)
If you already do computer music, chances are that all these tools(and a lot more) are already on your system. The ones I suggest are available in most Linux distributions without the need for compilation. Obviously, if you have experience you can use whatever software you prefer, I'm just giving some guidelines to help the less experienced.
Now, you have launched qjackctl, zynaddsubfx and vkeybd.
The next ste is to start ChucK's virtual machine. From a command line type:
chuck --loop &
This will launch the virtual machine, looping and advancing time in wait for commands.
Subsequent commands will be launched inside the living VM.
There is still one thing we need to do, connect the audio output of ZynAddSubFX to our alsa_pcm device(if it is not yet). We do it from the Connection panel of qjackctl, which will then show something like this:
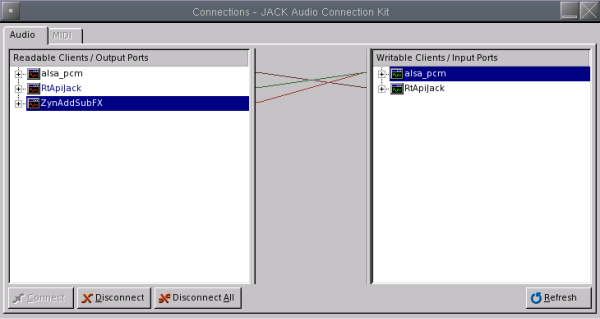
where:
- alsa_pcm on the left panel is our input device,like a microphone(we don't need it now)
- alsa_pcm on the right panel is our output device(speakers or headphones)
- RtApiJack on the left panel is ChucK's input port
- RtApiJack on the right panel is ChucK's output port
- ZynAddSubFX on the left panel is our software synthetizer's audio output port
Time to code ChucK is an object-oriented language, and includes a lot of useful objects ready to use. We are going to build a simple MIDI arpeggiator, so the first objects we need are MIDI related. The behaviour of our arpeggiator will be as follows: when we press a key on the midi keyboard, the corresponding midi event (note-on) will be captured by our program, which will then create an arpeggio (using an array of tones differences). The sequence of created notes will be sent to the software synthetizer to be played. I'll keep the code as simple as possible to focus only on the core concepts. Let's open our favourite editor, or use the experimental miniAudicle(you can find it on ChucK's site) and start writing code:
MidiIn min;
MidiOut mout;
MidiMsg msg;
We have just defined a MIDI input device (min) , a MIDI output device (mout) and a MIDI message object (msg). Now we need to open our MIDI devices, using the method open, which accepts a device number as argument. To get to know the device numbers we're interested in, let's type on the command line: chuck --probe In my case I get this as output: [chuck]: ------( chuck -- 2 MIDI inputs )------
[chuck]: [0] : "Midi Through Port-0"
[chuck]: [1] : "Virtual Keyboard"
[chuck]:
[chuck]: ------( chuck -- 2 MIDI outputs )-----
[chuck]: [0] : "Midi Through Port-0"
[chuck]: [1] : "ZynAddSubFX"
The numbers in square brackets are exactly what we need. So my MIDI input device, "Virtual Keyboard", has 1 as its device number, and same thing is for my MIDI output device "ZynAddSubFX". So our next lines of code will be:
min.open(1);
mout.open(1);
We should trap errors here but, as written before, let's ignore everything which is not vital for now. Now that our MIDI channels are open, we need to deal with incoming messages from our MIDI input device(the virtual keyboard in our case). We will start an infinite loop to wait for incoming messages, process them and wait again indefinitely.
while(true){
	min => now;
	min.recv(msg);
	if(msg.data1 == 144){
		spork ~ arpeggio(msg);
	}
}
The "while(true)" part is our conditional loop. For unseasoned programmers, a while loop just means "repeat what's between curly braces while the condition is respected. In this case, the condition is simply "true", which is obviously always true, so we are spawning an infinite loop. About the first line in the loop: min => now; some technical background is needed. The keyword now is a special one in ChucK. It is a time variable, if modified it will advance time, when read it will return the current ChucK time. The "=>" operator is an omnipresent one in ChucK, and can perform various actions depending on its "operands". It can be used to assign values, connect objects, do arithmetic operations etc. This said, what does our line of code do? It will wait for an event to be trapped by our MIDI input device(min). So in this case, "now" is used to suspend our loop execution until a specific event(MIDI) is raised. Cryptic? Don't worry, using it is easier than explaining it. At this point, a MIDI event reaches our "min" device, meaning that maybe a key on our virtual keyboard has been pressed. We receive the event and, using the recv method of out MidiIn device, we save it in our MidiMsg object ( msg). Our message owns now some data. The MidiMsg properties we'll be dealing with are: - data1 - the type of MIDI event
- data2 - the note number
- data3 - the velocity(a measure of the strength used when hitting a key)
In our "if" statement we're interested in data1, as we need to trap only "KeyOn" events.This is because a MIDI event is generated when both a key is pressed and when it is released. The event number for a pressed key is 144, so we check that the event we receive is actually a NoteOn one. If so we spawn a new process. This is the meaning of the line:
spork ~ arpeggio(msg);
The spork keyword is used to launch a process inside the active ChucK VM. These processes are called "shreds".
This new process will execute a function called "arpeggio"(which we're going to create), passing as argument the MidiMsg object containing the received data.
We are using shreds because we need to act in a non-blocking mode. Let me try to explain this better:
in our "while" loop, if we used a synchronous approach when a key-press occurres, we should wait for the arpeggio to end before pressing another key. Sporking the arpeggio function instead, will launch the arpeggio independently from the main loop so, for example, if while an arpeggio is performing we press another key, a new shred is spawned and the arpeggio for the new note will start immediately, so we will hear both arpeggios playing at the same time.
Good, we've covered some key concepts to deal with ChucK.
What we need now is the function that will create the arpeggio effect, starting from the MIDI note played on the keyboard and following a pre-defined note-progression.
Here is our function:
01:	fun void arpeggio(MidiMsg mymsg){
02:		MidiMsg message;
03:		mymsg.data1 => message.data1;
04:		mymsg.data2 => message.data2;
05:		mymsg.data3 => message.data3;
06:
07:		[0,4,3,4,5,-5,-4,-3] @=>  int scale[];
08:		for ( 0 => int i; i < scale.cap();  i++){
09:			144 => message.data1;
10:			scale[i] +=> message.data2;
11:			mout.send(message);
12:			300::ms => now;
13:			128 => message.data1;
14:			mout.send(message);
15:		}
16:	}
Note that line numbers are not part of the code; I've line-numbered the code to avoid rewriting each line while explaining. On line 1 we define a function whose name is arpeggio, which returns nothing(void) and accepts a MidiMsg type object as input. On line 2-5 we define a local MidiMsg object and assign to it data from the original MidiMsg, this to avoid interferences with the original object. Then, on line 7 we create an array of integers and assign to it the values between square brackets. It will contain note distances, let's explain this concept: we previously saw that the data2 property of a MidiMsg object contains a note number. On this notation notes are divided into half-tones, so adding 1 to a note means obtaining a half-tone higher note, adding 3 means adding one tone and a half a so on. So, in our scale array the sequence will be : original note(+0), original note plus 2 tones(+4), original note plus 3 tones and a half(+4 +3) and so on. The effect will be a scale progression going up a returning down once. The for loop on line 8 is used to iterate through the "scale" array ( scale.cap() contains the number of elements in the array), so that the code between curly braces will be executed for every note distance in the array. Let's see in details what this code does: On line 9 we set a MIDI event 144 (NoteOn) to allow voluming up the note On line 10 we add ( "+=>") the current array index value (0 the first time, 4 the second,........., -3 the last) to the current note value On line 11 we send the MidiMsg with the new values to our MidiOut device( mout), so the note will be actually played On line 12 we wait for 300 milliseconds to allow the note to play for a while On line 13 we change the Midi event to 128 (noteOff) On line 14 we send the MidiMsg again to mout. This time the NoteOff event will make the note stop playing and so on until the progression is done. Now save the file, i.e. with name "arpeggio.ck" and from the command line launch: chuck + path_to_file/arpeggio.ck If everything is set up correctly you'll see something like: [chuck](VM): sporking incoming shred: 1 (arpeggiator.ck)...
and pressing a key on the virtual keyboard you should hear the arpeggio thru your midi out device (ZynSuAddFX in our case). A long explaination for a fairly easy example, but I would like this to be a full immersion introduction to ChucK. Just playing around with this simple example I'm sure you'll be amazed by the range of applications you can come out with using this language/platform. 'Til next article. |
